Beautiful Work How To Do Floating Shelves Metal Bookcase Industrial
Pin On Exercise
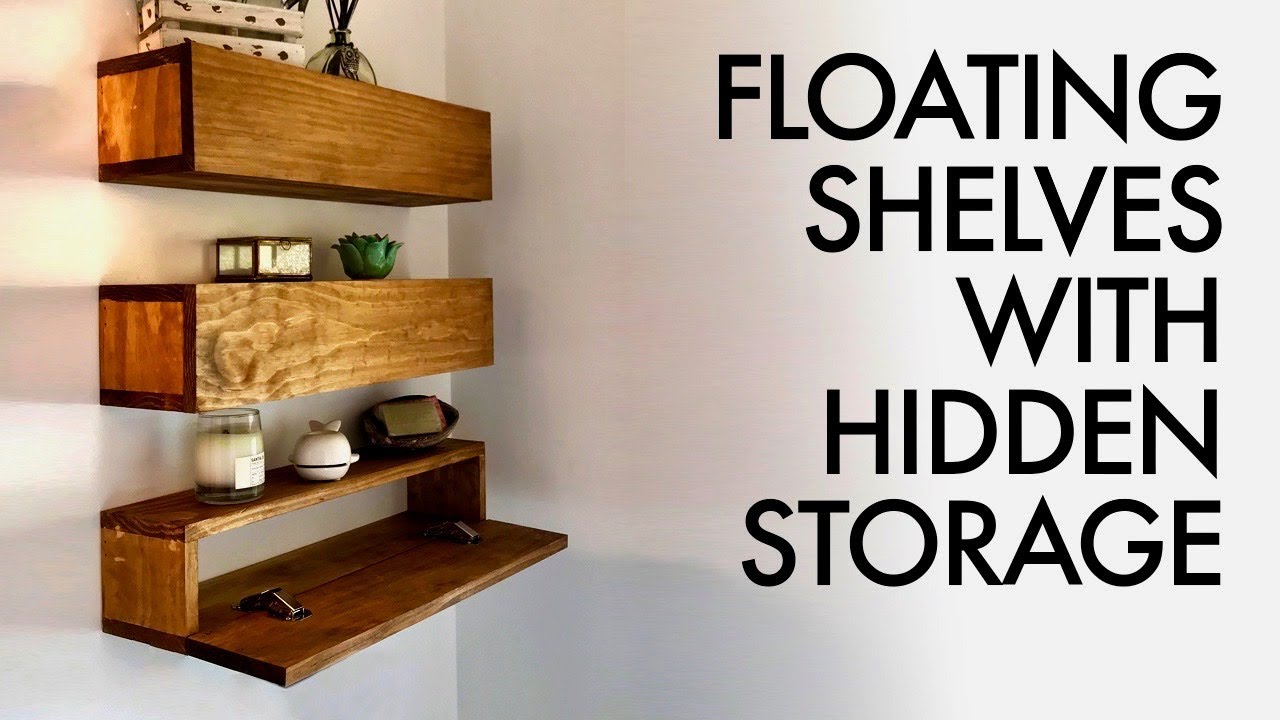
How to Hang Floating Shelves Method 1 of 3. Examine the wall where youre putting your shelf then measure out the desired length of the shelf. - Bind the shims together making a shim sandwich with masking tape or duct tape or whatever other type of type will stick to your shelf. We cut ours to 25 per shelf. Build your own floating shelves so that theyre hollow. Wide along the entire length of the roll. The best way to do this. Measure and mark the spaces on the wall on both ends of where you want the shelf to go. Building floating shelves is a really easy and quick project and involves a few cuts and boards. Cut your board down to size and gather materials.
Watch our step-by-step video showing how to put up a floating shelf with expert advice and top tips to help you complete the job with confidence.
Measure and mark the spaces on the wall on both ends of where you want the shelf to go. Use the level and a pencil to make marks showing where you want the mounting brackets to go. Of overhang when you apply the veneer to the front and sides of the shelf. - Bind the shims together making a shim sandwich with masking tape or duct tape or whatever other type of type will stick to your shelf. You can use angle brackets which is very easy but you will see the brackets so its not my favorite method and it wont make them exactly floating since you will see the attachment method. Using a level draw a discreet line in pencil across the wall to ensure that your shelf will sit straight.
Using Floating Shelf Brackets. Lay out the roll veneer side down and draw a straight line using a marker and straightedge at 3 in. Obviously youll want to customize the size to fit the space where you plan to hang them. - Then tape the shim sandwich onto the shelf with the longest edge of the shim sandwich lined up with the lower edge of the shelf. The most cost-effective way to create DIY floating shelves is to buy a larger piece of wood and cut it into smaller sections using a miter or circular saw. Step 1 Measure and make the cuts Check out the plans for guides to building your own shelf. There are a couple of ways to. How to Install Floating ShelvesDIY Floating ShelvesIn this video I show you step by step how to properly install a floating shelf. We cut ours to 25 per shelf. Attach the bracket using a screwdriver or drill.
The best way to do this. You can use angle brackets which is very easy but you will see the brackets so its not my favorite method and it wont make them exactly floating since you will see the attachment method. Wide along the entire length of the roll. How to Install Floating ShelvesDIY Floating ShelvesIn this video I show you step by step how to properly install a floating shelf. Use the level and a pencil to make marks showing where you want the mounting brackets to go. Watch our step-by-step video showing how to put up a floating shelf with expert advice and top tips to help you complete the job with confidence. Find the studs using your stud finder. Hold the cleat to your line on the wall and drill into the stud with a 18 in. Building floating shelves is a really easy and quick project and involves a few cuts and boards. The cleat acts as a floating shelf mount.
How to Install Floating ShelvesDIY Floating ShelvesIn this video I show you step by step how to properly install a floating shelf. The most cost-effective way to create DIY floating shelves is to buy a larger piece of wood and cut it into smaller sections using a miter or circular saw. You can always modify the width and depth to fit your needs. Decide the length of your shelf. - Bind the shims together making a shim sandwich with masking tape or duct tape or whatever other type of type will stick to your shelf. Lay out the roll veneer side down and draw a straight line using a marker and straightedge at 3 in. Of overhang when you apply the veneer to the front and sides of the shelf. Step 1 Measure and make the cuts Check out the plans for guides to building your own shelf. There are a couple of ways to. Using Floating Shelf Brackets.
The cleat acts as a floating shelf mount. Method 3 of 3. Wide along the entire length of the roll. Building floating shelves is a really easy and quick project and involves a few cuts and boards. How to Install Floating ShelvesDIY Floating ShelvesIn this video I show you step by step how to properly install a floating shelf. Build your own floating shelves so that theyre hollow. Find the studs using your stud finder. Each floating shelf supports cleat must be straight as an arrow. There are several ways you can attach floating shelves. The most cost-effective way to create DIY floating shelves is to buy a larger piece of wood and cut it into smaller sections using a miter or circular saw.
The most cost-effective way to create DIY floating shelves is to buy a larger piece of wood and cut it into smaller sections using a miter or circular saw. We cut ours to 25 per shelf. You can always modify the width and depth to fit your needs. Using a level draw a discreet line in pencil across the wall to ensure that your shelf will sit straight. Decide the length of your shelf. Using a wrench install one lag screw into each stud until its tight. Method 2 of 3. How to Install Floating ShelvesDIY Floating ShelvesIn this video I show you step by step how to properly install a floating shelf. About Press Copyright Contact us Creators Advertise Developers Terms Privacy Policy Safety How YouTube works Test new features Press Copyright Contact us Creators. Building floating shelves is a really easy and quick project and involves a few cuts and boards.